Recording a Video of Your Screen in Microsoft PowerPoint

Question:
How do I record a video of my screen in PowerPoint?
Answer:
To record your computer screen and related audio, and then embed it in your PowerPoint slide (or you can save it as a separate file) perform the following:
Note:
  • To record and listen to audio associated with your screen recording, you'll need a sound card, microphone, and speakers.
  • Make sure there's enough disk space on your local drive to record and save your screen recording.
Record from your computer screen and embed the recording in PowerPoint
  1. Open the slide that you want to put the screen recording on
  2. On the Insert tab of the ribbon, select Screen Recording
  3. On the Control Dock, click Select Area (Windows logo key+Shift+A), or, if you want to select the entire screen for recording, press Windows logo key+Shift+F.
    Notes:
    • (The Windows logo key+Shift+F keyboard shortcut is only available if you have an Office 2016   Click-to-Run installation MSI-based installations don't have the shortcut. Additionally, the minimum required version of Office for the shortcut is 16.0.7571.2072.)
    • The minimum size area you can record is 64x64 pixels.
    • If you have opted to select an area, you see the cross-haired cursor Cross haired cursor
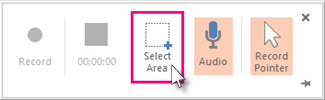
. Click and drag to select the area of the screen you want to record. (If you have already done a screen recording during your current PowerPoint session, your prior area selection will appear on the screen. You can proceed with recording if that selection area suits you, or you can click Select Area to start over.)
      Tip: PowerPoint automatically records the audio and the mouse pointer, so by default those options are selected on the control dock. To turn them off, deselect Audio (Windows logo key+Shift+U) and Record Pointer Windows logo key+Shift+O).
  4. Click Record (Windows logo key+Shift+R).
    Tip: Unless you pin the Control Dock to the screen, it will slide up into the margin while you record. To make the unpinned Control Dock reappear, point the mouse cursor at the top of the screen.
  5. To control your recording:
    • Click Pause to temporarily stop the recording (Windows logo key+Shift+R)
    • Click Record to resume recording (Windows logo key+Shift+R)
    • Click Stop to end your recording (Windows logo key+Shift+Q) (shown below).
  6. When you are finished recording, save your presentation: File > Save. The recording is now embedded on the slide you selected in step 2.
To save the recording itself as a separate file on your computer, right-click the picture on the slide that represents the recording, and select Save Media as. In the Save Media As dialog box, specify a file name and folder location, then click Save.

For more information:
https://support.office.com/en-us/article/record-your-screen-in-powerpoint-0b4c3f65-534c-4cf1-9c59-402b6e9d79d0
Additional Information:
There is no additional information.
We welcome and appreciate your feedback!
Privacy Policy | Website Terms and Conditions | University of Phoenix Trademark Usage

Copyright © 2018 University of Phoenix

Share
Subscribe
Enter your email address to receive a notification when the article is updated
Email Address
Subscribe
Unsubscribe
Share
To
Subject
Message
Send

Was this article helpful
Thank you for your feedback
How can we improve?